2 in 1 DIY: Jecklin disk & Snare/HH isolation baffle
The problem
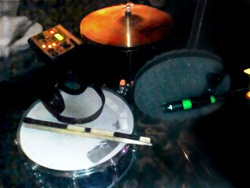
Have you had the nightmare of too much hi-hat bleed in the snare mic? There is a quite an easy way to minimize it! Compact, easy to do and functional DIY: a Snare/HH bleed isolator which alternatively can be used as a Jeckin disk – a useful tool for those who love the sound of natural stereophony. Sound samples included.
Of course it is not always the case that bleed should definitely be a bad thing. It could, in fact, be an useful addition to the overall sound of an instrument or group of musicians – especially where high quality transducers with “musical” off-axis response are being employed and a healthy phase coherence between the signals has been accomplished.
Unfortunately when dealing with hi-hat spill this rarely is the case. Furthermore, “musical” is not exactly the term which describes best the off-axis performance of a microphone like the sm57 (the one most often used for the purpose), and to have a good phase coherence becomes more and more difficult with every next transducer involved in the recording.
It is usually the drummer, his kit, the room, the equipment involved, the microphone placement, and God knows what else that has a huge role in the build-up of the entire sonic picture. At the end of the day, it all depends a lot on the way in which the different signals will interact when mixed and processed and spill is an inevitable part of all this. It is a certain fact though that getting a great drum sound is among the biggest challenges, both for the recording and the mixing engineer. Thus, every little improvement during the tracking stage is of a great help. It is here that one should first consider taking actions if he wants to minimize the bleed and the reasons for this could be many.
A lot derive from our desire to alter the sound of the snare drum without this to affect much the rest of the kit. Others of what such spill happens to do to the overall sound of the drums. A pretty common situation is the need to put an EQ on the snare drum mic signal and boost in the high frequency area, say for example at 8KHz. Such tweak could make the instrument more present in the mix. The problem in is that by doing this with a signal which already contains a lot of HH (and other cymbals too), such change will affect not only the snare. The scenario often resolves in an overall kit sound which is rather harsh or unnatural. Furthermore, the given example is just one of the many problems that may occur because of excessive HH bleed.
We wouldn’t have had this problem if our snare spot was picking up more of what it is intended to. Many people try to resolve the problem during the mixing by using different gate techniques, filters and EQs, side-chain processing and de-essers, etc. Some deal with it by adding a triggered by the spot mic additional “perfect” sample, which they have taken from the same or other kit. Others wisely address the issue during the tracking by replacing the HH with a smaller one, informing the drummer about the issue and asking him to alter his performance, or even getting another drummer! Unfortunately such techniques are either time-consuming, they don’t do the job without additional sonic compromises, affect the flow of the session, or in some situation are simply impossible to be applied.
The solution
Fighting with the issue myself I had already tried many of the described methods above and have read a lot about others when I first heard of the snare/hi-hat separator in the famous audio geeks forum “Gearslutz“. The idea is not of someone else but Bruce Swedien himself – the person responsible for so many of the greatest recording of the last century.
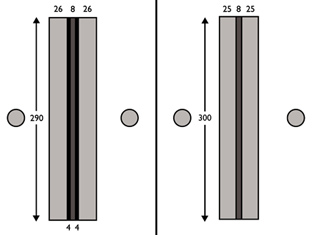
On the left is a model of my construction and the one on the right is of the original disk according to the dimensions given by Jürg Jecklin.
His original baffle is made of “a layer of Plywood, a layer of Mu-Metal (similar to lead) and a layer of compressed wood”. This construction maybe would work even better than mine because of the Mu-Metal, but my approach was a bit different as I wanted a lighter baffle which could be used as a Jecklin disk too (while still rendering good isolation results). As a base of my isolator I used a sheet of 8mm thick plywood. On top of it, I glued on each side a layer of 4mm cork using a standard acoustic foam liquid adhesive (in this case Auralex Tubetak Pro, but anything will work). On the cork, applying the same adhesive, I attached on both sides a layer of 1′ acoustic foam. The final disk is 68mm thick and has a radius of 29cm – something which is very close to the original disk designed by Jürg Jecklin, but can’t be called a perfect reconstruction of it. The original dimensions which Jecklin gives in his 1980′s paper “Microfon Aufnahme Systeme” are: 150mm radius, 8mm thick base with 2x 25mm acoustic material stuck on the base. The distance between the microphones should be 165mm and pure pressure transducers must be used.
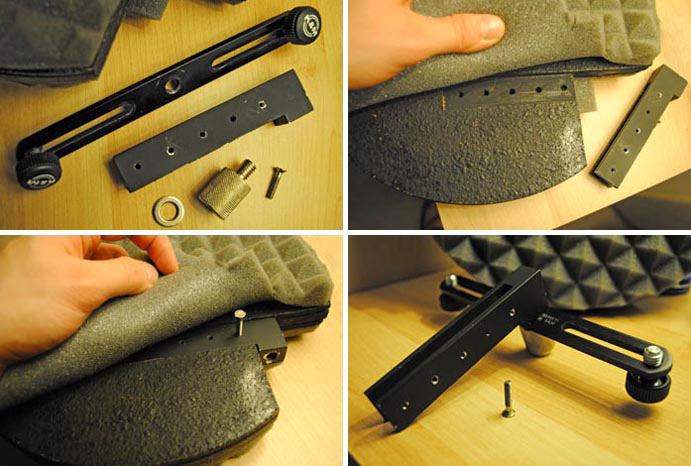
Here is the construction which holds the microphones to the disk and is used to attach the disk to a mic stand. Note that the stereo bar could easily be removed and in this way turn the disk into an acoustic baffle.
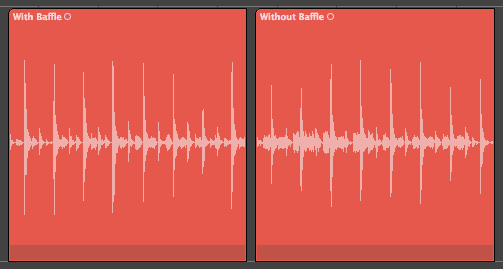
- The result from the baffle can not only be heard, but also seen. Notice the reduced HH spill on the left and the no-baffle signal on the right.
Despite the slight differences in size between my construction and the original Jecklin’s specifications, I have found that it works really well with most sources, but some small solo instruments. It combines the most natural sound of omnidirectional microphones (no low frequency loss with increase of the distance to the source and a lovely off-axis response) and a better stereophonic localization than a standard spaced AB pair (delivered by the shadowing effect of the disk). One downside of the so constructed disk is that it changes a bit the strait on-axis mid-frequency response of the mics making the sound coming directly from the front a bit muffed and hollow (thus giving the impression of exaggerated low end). However, where a bigger amount of players are being recorded the disk has proven to be invaluable, delivering great results both when listened on speakers and headphones.
As an acoustic baffle the disk shows satisfactory results and the level of spill reduction is clearly noticeable both in the sound examples and even from the waveform pictures of the samples provided. Have a listen – maybe it is time for to do a little DIY job.
Shure sm57 on Snare without the Acoustic Baffle
Shure sm57 on Snare with the Acoustic Baffle






Hi Nikolay,
I just want to say thank you for sharing your reamping experiences!!
I have a hobby project studio at home and have been trying to understand how to make my recordings sound better.
Unfortunately I only have a spare room at home that is made of brick so it is hard to reamp in that space
I look forward to reading your blog about reamping vocals!!
Kind Regards,
Darren Brown
Brisbane, Australia
Great trick, thanks. It would be cool to add a picture with the final product thought!
Would a denser material like the mu-metal be better at reflecting high frequencies? I feel like the squishy foam you use would help better with the lower midrange of the hats?
well, the idea of the foam is to absorb some of the HFs. The wood in the middle blocks the mids. The lows and even low mids will simply diffract around the disk, so no difference there. If you were to use metal as a minus you will get more reflections, but as a plus possibly increase the shadowing effect. So you may get less spill. The trouble tho is that the reflected sound may cause comb filtering (snare sound reaching the mic first, then bouncing back from the disk and going back to the mic). Also keep in mind that the very close proximity of the disk will probably alter the polar pattern of the mic used on the snare. So I actually nowadays stopped using the disk 🙂 But I’ll leave this topic here, as others may prefer the technique.
Thanks for sharing the problem and the solution! I’m just about to build my own – I was just wondering if the metal bracket you used was available commercially? I’m struggling to find a neat solution for mounting to a stand.
Hi Gareth, I actually had this custom made by a friend who at the time had the tools to needed to build it. I would have been keen to send over one of my spare brackets, but I only have one with me left here in the UK and I think the rest are in Bulgaria ATM. I’ll send an email in case I find any